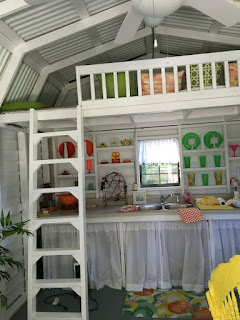
Constructing a Simple Loft Shed: A Beginner's Guide
Building a loft shed presents a rewarding DIY project, offering increased storage capacity and aesthetic appeal to your property. However, for first-timers, the process can seem daunting. This comprehensive guide provides a step-by-step approach, emphasizing safety and clarity to ensure a successful build.
Phase 1: Planning and Preparation
Thorough planning forms the cornerstone of any successful construction project. Neglecting this crucial stage can lead to costly errors and unforeseen delays. Before purchasing any materials, meticulously plan every aspect of your shed construction.
Site Selection and Preparation
The location of your shed significantly impacts its usability and longevity. Consider factors such as:
- Accessibility: Ensure easy access for material delivery and future maintenance.
- Sunlight and Shade: Optimize for natural light while considering potential overheating issues.
- Drainage: Select a site with good drainage to prevent water accumulation around the foundation.
- Local Regulations: Check for any building permits or restrictions imposed by your local authority. This is a crucial step often overlooked by novices.
- Ground Conditions: Assess the soil type and potential for shifting ground. This may influence your foundation choice.
Once the site is selected, prepare the ground by clearing vegetation, leveling the area, and removing any rocks or debris. A level base is paramount for a stable structure.
Materials and Tools
Accurate material estimation is crucial to avoid waste and delays. A detailed materials list, considering your shed dimensions, should include:
- Pressure-treated lumber: For the frame, floor, and roof.
- Plywood or OSB: For sheathing the walls and roof.
- Roofing material: Asphalt shingles, metal roofing, or other suitable options.
- Fasteners: Nails, screws, and bolts in appropriate sizes and quantities.
- Concrete or gravel: For the foundation, depending on your chosen method.
- Paint or stain: For weather protection and aesthetic enhancement.
- Building wrap: To protect against moisture ingress.
Gather the necessary tools. This will significantly streamline the construction process. Essential tools include:
- Measuring tape and level: For accurate measurements and ensuring level surfaces.
- Circular saw and hand saw: For cutting lumber.
- Drill and screwdriver bits: For driving screws and fasteners.
- Hammer: For driving nails.
- Shovel and post-hole digger: For foundation preparation.
- Safety equipment: Safety glasses, work gloves, hearing protection, and sturdy work boots.
It is advisable to create a detailed cut list before starting to cut any lumber. This will minimize material waste and ensure you have all necessary components ready.
Phase 2: Foundation and Framing
The foundation provides the structural base for your shed. The framing then supports the walls, roof, and loft.
Foundation Construction
Two common foundation options are concrete slabs and gravel bases. Concrete slabs provide a more robust and level base, while gravel bases are simpler and quicker to construct but less stable. The choice depends on your budget and ground conditions.
For a concrete slab foundation, excavate the area, add a compacted gravel base, and then pour the concrete, ensuring a level surface. Allow ample time for the concrete to cure completely before proceeding.
For a gravel base, excavate the area, lay down a layer of landscape fabric to prevent weed growth, and then compact several inches of gravel to create a level surface.
Framing the Shed
The framing provides the structural support for your shed. Construct the floor frame using pressure-treated lumber, ensuring accurate measurements and square corners. Attach the floor frame securely to the foundation.
Next, erect the wall frames. Ensure the frames are plumb and square, using bracing to maintain stability. Connect the wall frames to the floor frame using appropriate fasteners.
Construct the roof frame using rafters or trusses. This is a structurally critical part of the project. Ensure the roof frame is appropriately pitched to facilitate water runoff.
For the loft, you will need to build a supporting structure within the shed framework. This might involve adding interior walls and supporting beams to ensure the loft floor is robust and can support the intended load.
Phase 3: Sheathing, Roofing, and Finishing
Once the framing is complete, sheathing, roofing, and finishing touches complete the structure.
Sheathing the Walls and Roof
Attach plywood or OSB sheathing to the exterior walls and roof framing. Ensure the sheathing is properly aligned and secured using appropriate fasteners. This provides a solid base for the exterior cladding and roofing material.
Roofing Installation
Install the chosen roofing material according to the manufacturer's instructions. This is a crucial step in preventing water damage. Ensure proper overlap and sealing to prevent leaks.
Exterior Cladding and Finishing
Install any exterior siding you have chosen. This can be anything from simple wood planks to more complex options. Finish with paint or stain for weather protection and aesthetic enhancement.
Interior Finishing
Install the loft floor, making sure to use sturdy materials capable of supporting the intended weight. Finish the interior walls with drywall or paneling, and install any necessary insulation.
Phase 4: Final Touches and Safety Checks
Before declaring the project complete, conduct a thorough inspection and address any remaining tasks.
Final Inspection
Carefully inspect the entire structure for any loose fasteners, gaps, or imperfections. Address any identified issues promptly to ensure structural integrity.
Safety Checks
Ensure all electrical wiring (if any) is properly grounded and protected, and that all fire safety measures are in place.
Clean Up
Dispose of all construction debris responsibly. This contributes to environmental sustainability and demonstrates responsible building practices.
Building a simple loft shed may seem challenging initially, but with meticulous planning, careful execution, and adherence to safety guidelines, you can successfully construct a valuable addition to your property. Remember, safety is paramount. If at any point you are unsure about a step, consult with a qualified professional.


0 comments:
Post a Comment
Note: Only a member of this blog may post a comment.