Saturday, January 25, 2025

Beginner-friendly guide to storage shed building

A Comprehensive Guide to Storage Shed Construction for Beginners

Constructing a storage shed can be a rewarding undertaking, offering a practical solution for organizing outdoor equipment and maximizing property space. This comprehensive guide provides a step-by-step approach for novice builders, encompassing crucial considerations from initial planning to final finishing touches. While prior experience is helpful, this guide emphasizes clarity and detail to empower beginners to successfully complete this project.

Phase 1: Planning and Preparation

Site Selection and Assessment

The foundation of any successful shed construction lies in proper site selection. Consider the following factors:

  • Accessibility: Ensure easy access for delivery of materials and future use of the shed.
  • Ground Conditions: Assess the terrain for levelness and potential drainage issues. Sloping ground might necessitate additional groundwork.
  • Sunlight and Shade: Evaluate the amount of sunlight and shade the site receives. Excessive sun exposure might warrant considerations for ventilation or temperature control.
  • Proximity to Utilities: Maintain sufficient distance from underground utilities to prevent accidental damage during construction.
  • Local Regulations: Check with your local municipality for building permits, setback requirements, and other relevant regulations.

Design and Material Selection

Choosing a shed design and materials significantly impacts the project's complexity and overall cost. Consider these aspects:

  • Size and Dimensions: Determine the required storage space based on your needs. Accurate measurements are paramount for material estimations.
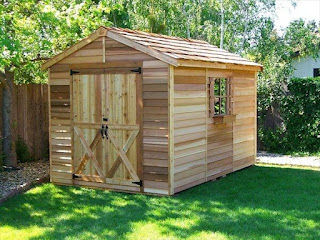
  • Shed Style: Explore various designs (e.g., A-frame, gable, gambrel) to find one that suits your aesthetic preferences and practical requirements.
  • Materials: Popular options include pressure-treated lumber for durability, vinyl for low-maintenance, and metal for strength and longevity. Factor in budget and desired longevity when selecting materials.
  • Foundation Type: Common foundation choices include concrete slabs, gravel pads, and wooden platforms. The choice depends on the shed's size, weight, and ground conditions. A concrete slab offers superior stability, while a gravel pad is a simpler, more budget-friendly alternative.

Acquiring Necessary Tools and Materials

Thorough preparation is essential for a smooth construction process. Create a detailed materials list based on your design plans, ensuring you have sufficient quantities of all necessary components. Acquire the following tools (rentals are acceptable for less frequently used items):

  • Measuring Tape: Accurate measurements are critical throughout the process.
  • Level: Maintaining levelness is crucial for structural integrity.
  • Shovel and Post Hole Digger: Needed for foundation preparation, if applicable.
  • Circular Saw and Hand Saw: For cutting lumber to precise dimensions.
  • Drill and Screwdriver Bits: For assembling the shed's frame and other components.
  • Hammer: A versatile tool for various tasks.
  • Safety Glasses and Gloves: Protecting your eyes and hands is non-negotiable.

Phase 2: Foundation Construction

Preparing the Ground

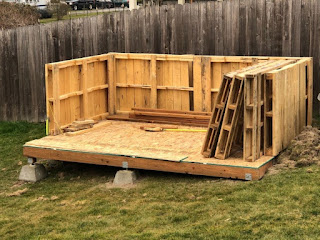
Proper ground preparation is crucial for a stable and level shed foundation. This involves clearing the site of vegetation, leveling the ground, and potentially compacting the soil to prevent settling. For a concrete slab foundation, excavation to the appropriate depth is necessary, followed by the creation of a formwork.

Foundation Construction (Example: Concrete Slab)

Once the ground is prepared, the concrete slab can be poured. This involves placing reinforcing mesh within the formwork to enhance the slab's strength and durability. Ensure proper grading to manage water runoff away from the shed. Allow ample curing time (typically 24-72 hours) before proceeding to the next phase. For alternative foundation types (gravel pads, wooden platforms), refer to specific instructions relevant to your chosen method.

Phase 3: Frame Construction

Building the Floor Frame

The floor frame provides a solid base for the walls and roof. Using pressure-treated lumber, construct a rectangular frame according to your design specifications. Ensure precise measurements and secure joints using appropriate fasteners (screws or nails). Remember to maintain levelness throughout this process.

Erecting the Wall Frames

Wall frames are typically constructed separately before being erected and secured to the floor frame. Use plumb bobs and levels to ensure verticality and squareness. Pre-drilling pilot holes before fastening minimizes the risk of wood splitting. Consider installing window and door openings during this stage.

Roof Frame Construction

Roof construction varies depending on the chosen shed style. A-frame roofs are relatively straightforward, while gable and gambrel roofs involve more complex framing techniques. Ensure proper rafter spacing and secure connections to maintain structural integrity. Consider the weight of roofing materials when determining rafter sizing.

Phase 4: Exterior Sheathing and Roofing

Applying Exterior Sheathing

Once the frame is complete, attach exterior sheathing (e.g., plywood, OSB). Ensure proper alignment and secure fastening to create a solid and weather-resistant exterior. Consider adding house wrap for additional weather protection.

Roofing Installation

Install the chosen roofing material according to the manufacturer's instructions. Common roofing options include asphalt shingles, metal roofing, and corrugated plastic sheets. Pay attention to flashing around chimneys or vents to prevent leaks. Proper ventilation is crucial to prevent moisture buildup and extend the lifespan of the roofing.

Phase 5: Finishing Touches

Siding and Trim

Install the exterior siding, selecting a material that complements your chosen style and budget. Add trim to enhance the aesthetic appeal and protect exposed edges of the siding and roofing.

Door and Window Installation

Install the doors and windows, ensuring proper sealing to prevent drafts and moisture intrusion. Use weatherstripping to improve energy efficiency.

Painting or Staining

Protect your investment by applying a coat of paint or stain to the exterior of the shed. This helps to prevent deterioration from weather exposure and adds curb appeal.

Phase 6: Interior Finishing

While optional, interior finishing can improve functionality and organization. This might include installing shelving, adding insulation, and installing a vapor barrier to prevent moisture.

Disclaimer: This guide provides general information and should not replace professional advice. Always consult local building codes and seek professional assistance if needed. Safety should always be prioritized during construction. Wear appropriate safety equipment and follow all safety guidelines.

Continue reading

How to design and build a free pallet shed for your yard

Building Your Dream (and Totally Free!) Pallet Shed

Hey there, fellow DIY enthusiasts! So you're dreaming of a cute little shed for your yard, but the thought of those hefty lumber prices is making your wallet weep? Don't worry, friend! I'm here to tell you about the magic of pallet sheds. Yep, you can build a fantastic, functional shed using reclaimed pallets â€" completely free (or at least, very, very cheap!). It might sound crazy, but trust me, it's totally doable.

Step 1: The Great Pallet Hunt

Before we even think about hammers and nails, we need the stars of the show: the pallets! Now, this is where the adventure begins. The best places to score free pallets are:

  • Behind businesses: Grocery stores, hardware stores, and even some restaurants often discard pallets. Just politely ask if they have any they're getting rid of. Be prepared for a "no" sometimes â€" persistence pays off!
  • Craigslist and Facebook Marketplace: People often post free pallets or give them away for a small fee. Keep an eye out!
  • Construction sites (with permission!): This one requires a bit more finesse. Ask the foreman or site manager nicely if they have any pallets they're discarding. Remember to be respectful of their work and safety regulations.
  • Friends and family: Spread the word! You might be surprised how many people have old pallets lying around.

Once you've found your treasure trove of pallets, inspect them carefully. You'll want pallets that are sturdy and relatively undamaged. Avoid pallets with significant rot, pest infestation, or broken slats. Remember, you're building a shed, not a haunted house!

Step 2: Planning Your Pallet Palace

Now that you've got your pallets, let's get down to the nitty-gritty of design. Consider these things:

Size and Shape:

How much space do you need? A small shed for tools? A larger one for storage and maybe even a small workspace? Sketch out a basic plan. You can keep it simple â€" a square or rectangular shed is the easiest to build. Think about the footprint and height you want to achieve. Remember, working with pallets means you’re limited by their dimensions, so plan accordingly.

Foundation:

You'll need a solid foundation. Concrete is ideal but can be pricey. A cheaper and surprisingly effective alternative is using treated lumber for a simple frame. This will level your shed and prevent it from sinking into the ground. You can even just use a layer of gravel for a very simple, temporary foundation.

Door and Windows:

Where will the door go? How about windows for ventilation and light? Plan these out carefully and make sure you have enough pallets to accommodate them. You might need to get creative with cutting and joining pallets to make openings.

Step 3: Construction Time!

This is where the real fun begins! Gather your tools:

  • Hammer
  • Screws (exterior grade are recommended for durability)
  • Drill (with appropriate drill bits)
  • Measuring tape
  • Level
  • Saw (circular saw or hand saw)
  • Safety glasses
  • Work gloves

Important Note: Before you start disassembling pallets, check for any branding or markings that might indicate the wood has been treated with chemicals. If so, you'll want to wear a mask and take extra precautions. You might also want to consider whether you'll need any extra lumber, depending on your design.

Building the Frame:

Start by building your foundation frame (if you're not using concrete). Once that's done, begin assembling the walls. You can attach pallets directly to each other using screws. Remember to check for levelness frequently. For added stability, you can use additional lumber for bracing in the corners and between pallets.

Roofing:

The roof is probably the trickiest part. You’ll need to carefully plan the angle and how you’ll secure the roofing material. You can use more pallets for a simple shed roof, or you can add a layer of tar paper and then roofing felt for better waterproofing. A simple lean-to roof (one side higher than the other) is often the easiest option for a beginner.

Finishing Touches:

Once the walls and roof are up, it's time for the finishing touches! You can add a door (consider using a pre-made door or repurposing an old one), windows, and paint or stain to protect the wood and personalize your shed. Consider adding a simple latch or lock for security.

Step 4: Finishing and Enjoying Your New Shed!

Congratulations! You've built your very own free pallet shed! Give yourself a pat on the back â€" you've saved a bunch of money and created something truly unique. Now, go enjoy your new storage space! Remember, you can always add features like shelves or hooks later on.

Frequently Asked Questions

  • Are all pallets safe to use? No. Inspect them carefully for rot, pests, or chemical treatment markings. Avoid pallets showing signs of damage or decay.
  • How long will a pallet shed last? With proper construction and weather protection (paint or stain), a well-built pallet shed can last for several years. Remember that it won't last as long as a shed built from new lumber.
  • What kind of screws should I use? Exterior-grade screws are best for outdoor use. They are designed to resist rust and weather damage.
  • Do I need permits to build a shed? Check with your local building department. Depending on the size and location of your shed, you might need a permit.
  • Can I use pallets treated with chemicals? Yes, but wear protective gear (mask and gloves) and be aware that some chemicals might leach out over time.
  • What can I use for roofing? Tar paper and roofing felt provide good waterproofing. You can also use more pallets for a simpler roof, but it won't be as weather resistant.

Happy building, and remember to share your finished pallet shed with us â€" we'd love to see it!

Continue reading

How to Build a Wood Pallet Shed with a Professional Look on a DIY Budget

Building a Stunning Wood Pallet Shed on a DIY Budget

Transforming discarded wood pallets into a beautiful and functional shed is entirely achievable with a little planning and elbow grease. This guide walks you through building a professional-looking pallet shed without breaking the bank. Forget flimsy, rickety structures; we'll construct a sturdy and aesthetically pleasing addition to your property using readily available and inexpensive materials.

Planning Your Pallet Shed Project

Before you dive into the exciting world of pallet construction, careful planning is crucial. Begin by determining the shed's dimensions. Consider the space available, the items you intend to store, and local building codes. Sketch your design, noting the placement of doors, windows (if desired), and any internal shelving. Don't forget to account for the thickness of your pallet wood when calculating your overall dimensions.

Sourcing Your Pallets

Locating free or inexpensive pallets is key to staying within your budget. Check local businesses like grocery stores, construction sites, or even post online requests. Inspect each pallet meticulously; look for sturdy, untreated wood free from rot, pests, and excessive damage. Remember, the quality of your pallets directly impacts the final look and longevity of your shed.

Preparing the Pallets

Once you've gathered your pallets, it’s time for preparation. This crucial step significantly impacts the final aesthetic and structural integrity of your shed. Begin by thoroughly cleaning each pallet, removing any dirt, debris, nails, or staples that could interfere with construction or pose safety hazards. You might need a hammer, crowbar, and wire brush to achieve this.

Disassembling and Selecting

Carefully disassemble the pallets using a pry bar and hammer. Separate the planks, keeping the best quality ones for the main structure. Discard any damaged or unusable wood. This selective approach allows you to build with consistent and attractive materials, resulting in a more professional-looking shed. Remember safety firstâ€"wear safety glasses and gloves throughout the process.

Constructing the Shed Frame

With your prepared lumber, you can start assembling the shed's frame. This stage requires careful measurement and precision. Use pressure-treated lumber for the base and support beams to ensure longevity and stability. Build a sturdy rectangular base frame to support the entire structure. Then, erect the wall frames, ensuring they are plumb and square. Use appropriate fasteners â€" strong screws are recommended over nails for better durability.

Adding Strength and Stability

To enhance the stability of your structure, consider adding diagonal bracing to the corners of the frame. This simple step dramatically improves the shed’s resistance to wind and other external forces. Pre-drilling holes before screwing will prevent the wood from splitting and give you a cleaner, more professional finish.

Building the Walls and Roof

Once the frame is complete, you can begin attaching the pallet wood to the walls. Arrange the planks aesthetically, perhaps alternating the direction of the wood grain for a visually appealing pattern. Secure the planks firmly using screws. For added strength and weather protection, consider applying a sealant or wood preservative before attaching the planks. This prevents water damage and enhances the overall look of the shed.

Roof Construction

The roof is the final, crucial element. Choose a simple gable or shed roof design for ease of construction. Use sturdy planks and ensure adequate overhang to protect the walls from rain. Consider adding roofing felt or other weatherproofing materials for increased protection. Finish the roof with a layer of shingles, metal roofing, or even recycled materials for a truly budget-friendly and eco-conscious approach.

Finishing Touches and Enhancements

After completing the main construction, focus on the details to achieve that professional look. Sand down any rough edges or protruding nails for a smooth, safe finish. Apply a high-quality exterior wood stain or paint to protect the wood and give it a uniform, polished appearance. Consider adding a door and windows for functionality and improved aesthetics. You can even incorporate recycled materials such as reclaimed windows or upcycled doors to further reduce costs and enhance the shed's character.

Adding the Finishing Touches

The finishing touches are where you truly personalize your creation. Install a sturdy door with a secure latch. Consider adding hinges and handles that complement your overall aesthetic. Add ventilation to prevent moisture buildup and protect stored items. Simple additions like decorative trim or strategically placed lighting can elevate the appearance of your pallet shed beyond simple storage to a stunning outdoor structure. Remember, the details matter in transforming a DIY project into a professional-looking structure.

Continue reading

Wooden pallet shed construction ideas for affordable builds

Economical Pallet Shed Construction: A Comprehensive Guide

The allure of constructing a shed from reclaimed wooden pallets is undeniable. This approach offers a compelling blend of affordability and environmental responsibility. However, transforming discarded pallets into a functional and durable structure requires careful planning and execution. This guide provides a detailed exploration of economical pallet shed construction, addressing critical aspects from material selection to final finishing.

Phase 1: Planning and Design

Before embarking on construction, a comprehensive plan is paramount. This phase involves defining the shed's purpose, dimensions, and desired features, ultimately influencing material requirements and construction techniques.

1.1 Defining the Shed's Purpose and Dimensions:

The intended use dictates the shed's size and internal layout. A storage shed for garden tools requires different dimensions and features than a workshop or a small animal shelter. Consider the volume of items to be stored or the activities to be undertaken within the structure. Accurate measurements are crucial for material estimation and efficient construction. Sketching a basic floor plan, including door and window placement, is recommended.

1.2 Material Assessment and Sourcing:

Pallet selection is critical. Not all pallets are created equal. Prioritize pallets constructed from pressure-treated lumber (indicated by a stamp) for durability and resistance to rot and insect infestation. Avoid pallets displaying significant damage, such as severe cracking, splintering, or excessive rust from nails. Inspect each pallet thoroughly for any signs of infestation before incorporating it into the structure. Consider the pallet's dimensions; consistent sizing simplifies construction. Aim for a sufficient quantity to meet your design specifications, accounting for potential wastage.

1.3 Foundation Considerations:

The foundation serves as the base of the shed, ensuring stability and longevity. Several economical options exist, each with advantages and disadvantages. A simple gravel base offers a cost-effective solution for well-drained locations. For uneven terrain, a concrete slab may be necessary, although more expensive. Alternatively, consider using treated lumber for a raised platform, providing ventilation and preventing ground moisture from damaging the pallets.

Phase 2: Construction Techniques

Constructing a pallet shed involves multiple stages, from foundation preparation to final finishing. Careful execution at each stage is vital to the structure's stability and longevity.

2.1 Foundation Preparation and Pallet Layering:

Begin by leveling the chosen site and preparing the chosen foundation. This might involve excavating, compacting gravel, or pouring a concrete slab. Once the foundation is ready, begin laying the pallets. Ensure they are level and securely fastened to each other. Use appropriate fasteners â€" galvanized nails or screws are recommended to resist rust. Consider adding additional support beams between layers for enhanced strength. A stable base is crucial for preventing warping and sagging.

2.2 Wall Construction and Reinforcement:

Vertical pallet placement forms the shed's walls. Ensure consistent spacing and alignment to maintain structural integrity. Use sturdy fasteners to secure the pallets to each other and to the foundation. Consider reinforcing the corners with additional bracing to improve stability. For added strength and weather protection, apply a suitable sealant to the gaps between pallets. This sealant also helps to prevent the penetration of moisture, thereby prolonging the structure's lifespan.

2.3 Roof Construction:

The roof's design influences the overall aesthetics and functionality of the shed. A simple gable roof provides effective water runoff. Construct the roof frame using treated lumber, ensuring sufficient slope for drainage. Lay the pallets horizontally across the frame, securing them with appropriate fasteners. To provide additional weather protection, use roofing felt or other suitable roofing material. This layer prevents leaks and further safeguards the shed's contents.

2.4 Door and Window Installation:

Incorporate doors and windows to improve accessibility and ventilation. You can utilize reclaimed materials or purchase cost-effective alternatives. The door and window frames must be securely fastened to the pallet structure. Ensure a proper seal around the frames to prevent drafts and moisture ingress. Consider adding hinges and latches that resist the elements.

Phase 3: Finishing and Maintenance

The final stages of construction involve adding finishing touches to enhance the shed's appearance and durability.

3.1 Surface Treatment:

Applying a protective coating significantly extends the shed's lifespan. A wood sealant or stain protects against moisture damage and UV degradation. Choose a product compatible with pressure-treated lumber. Multiple coats ensure optimal protection. Consider applying a weather-resistant paint to improve the aesthetic appeal and further enhance protection from the elements. A carefully chosen colour can blend the structure seamlessly into its surrounding environment.

3.2 Internal Finishing:

Internal finishing improves the shed’s usability. Consider adding shelving for storage organization. Simple shelving units can be constructed from additional pallets or inexpensive lumber. Consider applying a suitable interior paint or sealant, particularly in areas that might be prone to moisture. This enhances the shed's overall appearance and makes it more suitable for its intended purpose. Choose colours and finishes that enhance the ambiance and complement the intended use of the space.

3.3 Ongoing Maintenance:

Regular maintenance is crucial for preserving the shed's integrity. Periodically inspect the structure for any signs of damage, such as loose nails, rotting wood, or insect infestation. Repair any damage promptly to prevent further deterioration. Clean the structure regularly to remove debris and prevent the growth of mold or mildew. Reapply sealant or paint as needed to maintain the protective coating and ensure the shed's longevity.

By following these guidelines, you can construct an affordable and functional pallet shed. Remember to prioritize safety throughout the construction process, using appropriate safety equipment and adhering to all relevant building codes.

Continue reading

Friday, January 24, 2025

Wooden pallet shed building plans for small garden spaces

Repurpose and Reign: Building a Charming Pallet Shed for Your Garden

Transform your small garden space from cluttered to captivating with a charming and functional pallet shed. This guide empowers you to build your own, utilizing readily available and cost-effective materials. Forget expensive pre-fabricated structures; embrace the rustic charm and sustainability of repurposed wooden pallets. We'll walk you through each step, ensuring you create a beautiful and durable storage solution perfectly tailored to your needs.

Planning Your Pallet Paradise: Design and Dimensions

Before you dive into construction, careful planning is key. Consider the size and shape of your available space. Measure carefully to determine the maximum dimensions for your pallet shed. Remember, you need sufficient space for comfortable access and ease of use. Sketch a basic plan, noting the placement of doors, windows (if desired), and the overall layout. You might opt for a simple square or rectangular structure, or even get creative with a slightly more complex design. Visualizing your finished shed beforehand prevents costly mistakes later.

Choosing the Right Pallets: A Matter of Quality

Not all pallets are created equal. Select sturdy pallets constructed from pressure-treated lumber, ideally free from significant rot, damage, or insect infestation. Inspect each pallet carefully for loose boards or broken components. Avoid pallets showing signs of chemical treatment incompatible with your garden. Clean the pallets thoroughly, removing any debris, dirt, or loose nails before construction begins. This ensures a solid foundation and a beautiful finished product.

Construction Chronicles: Building Your Pallet Shed

With your plan finalized and pallets selected, the exciting part begins! Begin by constructing the base. This could be a simple pallet base or a more robust one built from treated lumber for added durability. Secure the base firmly to the ground using concrete anchors or similar fixings. This step provides essential stability, preventing shifting and ensuring longevity for your shed. Then, carefully assemble the pallet walls, paying close attention to alignment and ensuring secure fastenings between pallets. Pre-drilling holes before driving screws reduces the risk of pallet splitting.

Adding Roof and Finishing Touches

Construct the roof using more pallets or sturdy roofing materials like corrugated metal sheets or waterproof plywood. Consider the climate; in areas with heavy rainfall, a robust roofing system is essential. Once the roof is securely in place, you can enhance your shed's functionality and aesthetics. Consider adding a simple door crafted from pallets or reclaimed lumber. Install hinges and a latch for security. You can add a window for natural light and ventilation. A coat of weather-resistant sealant protects the wood and enhances its lifespan. Consider painting or staining the shed to complement your garden's aesthetic.

Beyond the Basics: Personalizing Your Pallet Haven

Your pallet shed is now a blank canvas ready for your personal touch! Consider these additions to elevate your creation from functional storage to a charming garden feature:

  • Install shelving to maximize storage space.
  • Add a small workbench for potting plants or gardening tasks.
  • Create a charming flower box along the walls using repurposed materials.
  • Decorate the exterior with climbing plants or a small trellis.
The possibilities are endless! Let your creativity flourish and make this shed uniquely yours.

Building a pallet shed is a rewarding experience, blending practicality with eco-conscious design. It's a project that transforms your garden, providing invaluable storage while showcasing your creativity. So, gather your tools, and begin crafting your personalized pallet paradise!

Continue reading

Affordable Tuff Shed woodworking designs for DIY builders

Affordable Tuff Shed Woodworking Designs for DIY Builders

The allure of a dedicated workshop or storage space is undeniable for many woodworking enthusiasts. However, the cost of pre-fabricated structures can often be prohibitive. This article explores affordable Tuff Shed-inspired woodworking designs achievable by DIY builders, focusing on cost-effective materials, efficient construction techniques, and adaptable plans to suit various needs and budgets. We will delve into detailed design considerations, material selection strategies, and step-by-step guidance to empower you to build your own functional and aesthetically pleasing workspace.

Understanding Tuff Shed Aesthetics and Functionality

Tuff Sheds are known for their robust construction, straightforward designs, and adaptability to various applications. While replicating their exact specifications might necessitate specialized tools and materials beyond a typical DIY budget, we can capture the essence of their functionality and aesthetic appeal through careful planning and resourceful material selection. This involves understanding the key elements that contribute to a Tuff Shed's success: durability, simplicity of design, and efficient use of space.

Analyzing Tuff Shed Design Principles

A crucial first step is studying the fundamental design elements of a Tuff Shed. Observe the structural framing, the sheathing techniques, and the overall proportions. Note the simplicity of the roofline, the placement of doors and windows, and the integration of any additional features like shelving or workbenches. This analysis allows for informed decision-making during the design phase of your DIY project.

Adapting Designs to Suit Budget and Skill Level

It's vital to tailor the design to your specific skills and budget. Beginners might opt for a smaller, simpler structure with a single door and a gable roof. More experienced builders can tackle more complex designs with multiple doors, windows, and more elaborate rooflines. The choice of materials will significantly impact the overall cost; employing reclaimed lumber or cost-effective alternatives can drastically reduce expenses without compromising structural integrity.

Choosing Cost-Effective Materials

The selection of materials is paramount in determining the overall cost of the project. Opting for economical yet durable materials is key to achieving affordability without sacrificing quality. Careful consideration of each component's contribution to the overall structural integrity and longevity is essential.

Framing Lumber: Pressure-Treated vs. Untreated

Pressure-treated lumber offers superior protection against rot and insect infestation, especially crucial for structures exposed to the elements. However, it is generally more expensive than untreated lumber. For structures primarily intended for sheltered use, untreated lumber can be a cost-effective alternative, provided adequate protection against moisture is implemented.

Sheathing: Plywood, OSB, or Reclaimed Materials

Oriented Strand Board (OSB) is a cost-effective sheathing option, offering good strength and stability. Plywood provides a smoother finish but typically comes with a higher price tag. Exploring reclaimed materials like old pallets or salvaged lumber can dramatically reduce costs, although careful inspection for structural soundness is crucial.

Roofing: Asphalt Shingles, Metal Roofing, or Alternatives

Asphalt shingles are a common and relatively affordable roofing option. Metal roofing offers superior durability and longevity but typically commands a higher price. Alternatives such as recycled plastic roofing or repurposed materials can significantly reduce costs, but their suitability depends on local regulations and climate.

Detailed Construction Plans and Techniques

Developing comprehensive construction plans is crucial for efficient and successful project execution. These plans should include detailed drawings of the structure's dimensions, material specifications, and assembly instructions. Careful consideration of each step, from laying the foundation to installing the roof, minimizes material waste and ensures structural integrity.

Foundation Options: Concrete Slab, Gravel Base, or Pier Blocks

The foundation choice influences both cost and complexity. A concrete slab provides the most stable foundation but requires specialized skills and equipment. A gravel base is a simpler and more affordable alternative suitable for lighter structures. Pier blocks offer a compromise between stability and ease of construction.

Framing Techniques: Standard Framing Practices

Adhering to standard framing practices ensures structural strength and stability. This involves using appropriate framing lumber sizes, correct spacing of studs and joists, and proper connection techniques. Detailed diagrams and step-by-step instructions are essential for accurate execution.

Sheathing and Roofing Installation: Efficient Procedures

Efficient sheathing and roofing installation techniques minimize material waste and ensure watertightness. Using appropriate fasteners and ensuring proper overlap are crucial for long-term durability. Detailed instructions and visual aids can be invaluable in this phase of the construction process.

Adapting the Design for Specific Needs

The basic Tuff Shed design can be adapted to accommodate various specific needs and preferences. Consider the intended use of the structure when making design choices. A woodworking shop will have different requirements than a general storage shed.

Woodworking Shop Specifics: Workbench Integration, Dust Collection

For a woodworking shop, incorporating built-in workbenches, ample storage for tools and materials, and a dust collection system are essential. These features can be integrated into the initial design or added later as the budget allows.

Storage Shed Modifications: Shelving, Increased Capacity

For storage sheds, maximizing space through efficient shelving and racking systems is crucial. The design can be adapted to accommodate larger items or specialized storage requirements.

Conclusion

Building an affordable Tuff Shed-inspired structure is a feasible and rewarding project for DIY enthusiasts with careful planning, resourceful material selection, and adherence to sound construction practices. By carefully analyzing the design principles of existing structures, adapting the plans to suit personal skill levels and budgets, and employing cost-effective materials, you can create a functional and aesthetically pleasing workspace or storage solution that fits both your needs and your financial constraints. Remember that thorough planning and preparation are crucial for a successful and enjoyable building experience. The satisfaction of creating your own workshop or storage shed is a worthwhile reward for the effort invested.

Continue reading

Simple loft shed building tips for first-timers

Constructing a Simple Loft Shed: A Beginner's Guide

Building a loft shed presents a rewarding DIY project, offering increased storage capacity and aesthetic appeal to your property. However, for first-timers, the process can seem daunting. This comprehensive guide provides a step-by-step approach, emphasizing safety and clarity to ensure a successful build.

Phase 1: Planning and Preparation

Thorough planning forms the cornerstone of any successful construction project. Neglecting this crucial stage can lead to costly errors and unforeseen delays. Before purchasing any materials, meticulously plan every aspect of your shed construction.

Site Selection and Preparation

The location of your shed significantly impacts its usability and longevity. Consider factors such as:

  • Accessibility: Ensure easy access for material delivery and future maintenance.
  • Sunlight and Shade: Optimize for natural light while considering potential overheating issues.
  • Drainage: Select a site with good drainage to prevent water accumulation around the foundation.
  • Local Regulations: Check for any building permits or restrictions imposed by your local authority. This is a crucial step often overlooked by novices.
  • Ground Conditions: Assess the soil type and potential for shifting ground. This may influence your foundation choice.

Once the site is selected, prepare the ground by clearing vegetation, leveling the area, and removing any rocks or debris. A level base is paramount for a stable structure.

Materials and Tools

Accurate material estimation is crucial to avoid waste and delays. A detailed materials list, considering your shed dimensions, should include:

  • Pressure-treated lumber: For the frame, floor, and roof.
  • Plywood or OSB: For sheathing the walls and roof.
  • Roofing material: Asphalt shingles, metal roofing, or other suitable options.
  • Fasteners: Nails, screws, and bolts in appropriate sizes and quantities.
  • Concrete or gravel: For the foundation, depending on your chosen method.
  • Paint or stain: For weather protection and aesthetic enhancement.
  • Building wrap: To protect against moisture ingress.

Gather the necessary tools. This will significantly streamline the construction process. Essential tools include:

  • Measuring tape and level: For accurate measurements and ensuring level surfaces.
  • Circular saw and hand saw: For cutting lumber.
  • Drill and screwdriver bits: For driving screws and fasteners.
  • Hammer: For driving nails.
  • Shovel and post-hole digger: For foundation preparation.
  • Safety equipment: Safety glasses, work gloves, hearing protection, and sturdy work boots.

It is advisable to create a detailed cut list before starting to cut any lumber. This will minimize material waste and ensure you have all necessary components ready.

Phase 2: Foundation and Framing

The foundation provides the structural base for your shed. The framing then supports the walls, roof, and loft.

Foundation Construction

Two common foundation options are concrete slabs and gravel bases. Concrete slabs provide a more robust and level base, while gravel bases are simpler and quicker to construct but less stable. The choice depends on your budget and ground conditions.

For a concrete slab foundation, excavate the area, add a compacted gravel base, and then pour the concrete, ensuring a level surface. Allow ample time for the concrete to cure completely before proceeding.

For a gravel base, excavate the area, lay down a layer of landscape fabric to prevent weed growth, and then compact several inches of gravel to create a level surface.

Framing the Shed

The framing provides the structural support for your shed. Construct the floor frame using pressure-treated lumber, ensuring accurate measurements and square corners. Attach the floor frame securely to the foundation.

Next, erect the wall frames. Ensure the frames are plumb and square, using bracing to maintain stability. Connect the wall frames to the floor frame using appropriate fasteners.

Construct the roof frame using rafters or trusses. This is a structurally critical part of the project. Ensure the roof frame is appropriately pitched to facilitate water runoff.

For the loft, you will need to build a supporting structure within the shed framework. This might involve adding interior walls and supporting beams to ensure the loft floor is robust and can support the intended load.

Phase 3: Sheathing, Roofing, and Finishing

Once the framing is complete, sheathing, roofing, and finishing touches complete the structure.

Sheathing the Walls and Roof

Attach plywood or OSB sheathing to the exterior walls and roof framing. Ensure the sheathing is properly aligned and secured using appropriate fasteners. This provides a solid base for the exterior cladding and roofing material.

Roofing Installation

Install the chosen roofing material according to the manufacturer's instructions. This is a crucial step in preventing water damage. Ensure proper overlap and sealing to prevent leaks.

Exterior Cladding and Finishing

Install any exterior siding you have chosen. This can be anything from simple wood planks to more complex options. Finish with paint or stain for weather protection and aesthetic enhancement.

Interior Finishing

Install the loft floor, making sure to use sturdy materials capable of supporting the intended weight. Finish the interior walls with drywall or paneling, and install any necessary insulation.

Phase 4: Final Touches and Safety Checks

Before declaring the project complete, conduct a thorough inspection and address any remaining tasks.

Final Inspection

Carefully inspect the entire structure for any loose fasteners, gaps, or imperfections. Address any identified issues promptly to ensure structural integrity.

Safety Checks

Ensure all electrical wiring (if any) is properly grounded and protected, and that all fire safety measures are in place.

Clean Up

Dispose of all construction debris responsibly. This contributes to environmental sustainability and demonstrates responsible building practices.

Building a simple loft shed may seem challenging initially, but with meticulous planning, careful execution, and adherence to safety guidelines, you can successfully construct a valuable addition to your property. Remember, safety is paramount. If at any point you are unsure about a step, consult with a qualified professional.

Continue reading
 

Shed Design And Plans Copyright © 2016 | Powered by Blogger